
Lesson 8 - Heat Exchangers
This lesson focuses on the two main heat exchangers found in breweries, namely plate heat exchangers and shell and tube heat exchangers. The lesson will examine the components, assembly, and operation of these exchangers. It will also discuss how to select and size a heat exchanger and the considerations for cleaning, maintaining, and operating heat exchangers in the brewing process.
Plate Heat Exchangers Components and their Assembly
Before we can understand how a piece of equipment works, we need first to understand the parts that make it and how these parts are put together. Heat exchanger suppliers do a lot of research and development to ensure the design of every component is fit for purpose.
Exchanger components
As we can see in the image below, a plate heat exchanger consists of several thin plates packed together to form a ‘plate pack’. Between the plates, there are gaskets that direct the fluid flow and ensure there is no leakage between the plates.
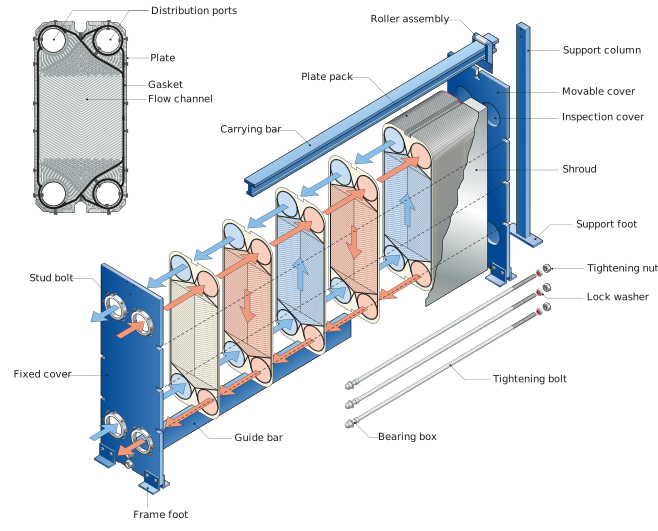
Figure: The components of a plate heat exchanger
The two major components of a plate heat exchanger are the plates and gaskets. These will be discussed in the next section of this lesson. For now, let’s look at some of the other components labelled in the image above:
-
At either end of the plate pack, there are two larger and thicker end covers.
-
Several tightening bolts run from one end cover to the other. Together with the fixed and moveable end covers these create an outer frame that holds the plate pack together.
-
Each tightening bolt has a tightening nut and a bearing box at each end. When tightened, the bolts squeeze the plates and gaskets together, making it watertight.
-
-
One end cover is fixed into position while the other is moveable.
-
Piping bringing fluid in and out of the exchanger is fixed to the end covers
-
The exchanger is opened from the moveable end cover side
-
In larger exchangers, the moveable end plate may rest on a carrying bar to make opening easier
-
-
The plate pack and end covers sit on a guide bar which holds them in position when the exchanger is opened.
-
All the plates and the fixed end cover have four circular holes, one in each corner called distribution ports. When the pack is assembled, these holes form a circular channel the length of the exchanger called a distribution passage. Utilities and product fluids enter and leave the exchanger through these distribution passages.
-
A support column and frame feet support the exchanger.
-
If required, the exchanger can also be supplied with a shroud.
-
This is a stainless steel cover that is wrapped over the plate pack.
-
It is used to protect the plate pack from environmental elements. It is also used as a precautionary safety measure so that if there is a leak on the exchanger, it is contained and cannot harm anyone.
-
View the video clip below to see how these components are assembled. Note, this is for illustrative purposes only and is not a recommendation or endorsement of the supplier’s product.
At the end of the video, did you see how the tightening bolts, nuts, and bearing box were used to tighten up the plate pack?
The pressure that a plate pack is tightened to is a very important parameter and will be unique for each exchanger. Too little pressure and the exchanger will leak, whereas too much pressure and the gaskets will be squeezed too tight and be damaged. The supplier of the exchanger will specify the torque to be applied to each tightening bolt on the exchanger to ensure the correct, even compression of the plates and gaskets.
Also, did you see how the four distribution channels run through the exchanger?
Material of construction
While the internals of the exchanger are usually stainless steel the end plates, frame and support column and feet can be supplied in either stainless steel or coated steel. For applications where aggressive fluids (such as water high in chlorides) are heated, titanium plates may be required. For brewery applications, full stainless steel exchangers are preferred for reasons of hygiene, maintenance, and appearance. This does, however, make them more costly. The image below shows a range of full stainless steel gasketed-plate heat exchangers.
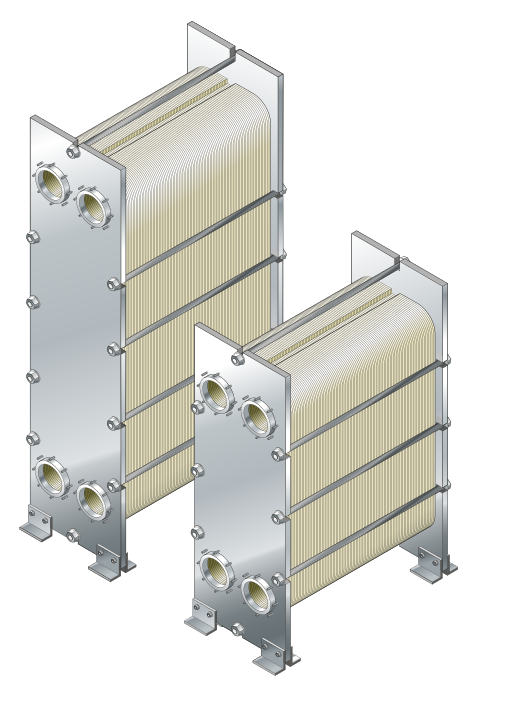
Figure: Full stainless steel plate heat exchangers
Now that you have a good overview of the components of the plate heat exchanger and how they are assembled let’s look at the design of the plates inside a plate heat exchanger.