
Lesson 4 - Process Instrumentation
This lesson takes a closer look at process instrumentation. Whilst it explores the basic operations of manual instruments, it primarily focuses on the instruments that can be used in process control. It also investigates in more depth the instrumentation commonly used within the brewery.
Analytical Instruments
Advances in technology have allowed us to measure variables that were historically once only measured in a laboratory.
This has made it much easier to control our processes, as much of it is being carried out in real time. In the past, you may have had to fill a part, or even an entire tank, and then analyse it to see if it is within specification. It is now theoretically possible for you to carry out continuous processing. Imagine filtering beer, correcting the alcohol and CO2 inline, and sending it directly to packaging! There are, of course, a number of other factors to consider in order for this to really be possible. For now, we will focus more on the limitations of the instruments, their accuracy, and their reliability.
pH instruments
We use two main types of sensor to determine pH. They both use the potentiometric principle. Typically, we use a glass (or special enamel) electrode where a potential is generated due to the difference in the ion concentration between a glass bulb and a reference electrode. As the ions physically enter the probe, this requires frequent calibration.
In situations where glass is undesirable, or a more robust probe is required, we can measure pH using an ion-selective field effect transistor (ISFET). A source and drain within the transistor are separated from the base with a semi-conductor. As hydrogen ions from the medium accumulate here, negative ions on the inside are attracted, which then makes the semi-conductor conductive. The figure below illustrates how these sensors work:
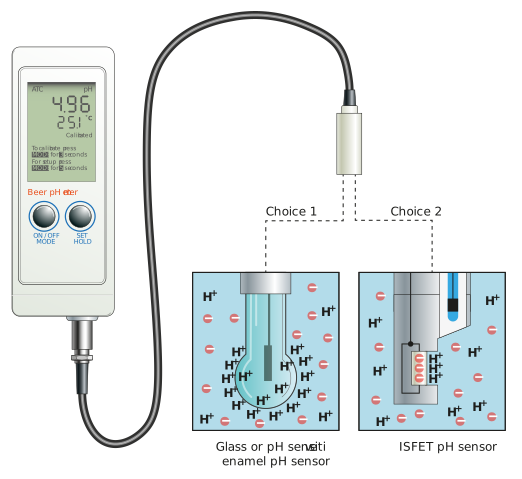
We must take particular care when installing the pH probes. There are special housings and assemblies that allow for the probes to be retracted and calibrated.
Although there is no need for us to delve into the full chemistry related to these instruments, if you want to understand their mechanisms in more detail, the following video shows how the probes work:
Optical instruments
Optical instruments in the brewery measure two main parameters: turbidity and colour. Turbidity is useful in a few areas; we can even use it to estimate yeast counts.
So, let us look at how these instruments work. A light beam is emitted, and photoelectric cells are used to measure the resultant light intensity. The light intensity is changed by light absorption and light scattering by particles. Different particles and concentrations have different effects.
Colloidal particles create the largest scatter at 90°, whilst yeast cells and filter aids such as kieselguhr tend to scatter the light forward. Different equipment suppliers argue whether 25° or 11° is the best angle to measure these at, but we will leave them to dispute this. Another useful measurement angle is the direct beam measurement at 0°, as this can be used to measure very high turbidities, such as those experienced during pre-coating on a powder filter. The figure below shows a schematic of a typical multi-angle light scatter photometer:
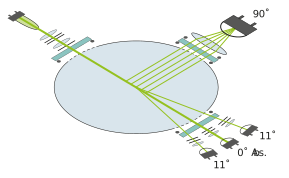
Figure: Typical multi-angle light scatter photometer
We can use a number of reference systems, including:
-
EBC = European Brewery Convention
-
FTU = formazin turbidity units
-
NTU = nephelometric turbidity units
-
ASBC = American Society of Brewing Chemists
-
Helms = turbidity unit
-
mg/L (DE) = parts per million (diatomaceous earth)
It is important to know what units are being referenced.
If you want to know more about the 11° vs 25° argument, the following two publications by competitors in the industry will shed some further light on the subject. Note, this is for illustrative purposes only and is not a recommendation or endorsement of the supplier’s product.
https://www.optek.com/pdf/Top5/optek-Brochure-TOP5-Brew-US.pdf
Whilst the multi-angle instrument is very good for measuring beer haze, single channel instruments are used for many other applications such as beer/yeast interfaces, yeast concentration, colour, and beer/water interfaces. The figure below shows one of these simpler instruments:
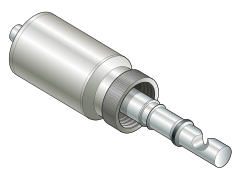
Figure: Single channel absorption probe
Density measurement and calculation of alcohol
We use similar sensors to measure density and calculate alcohol concentration. The difference lies in the processors that do the calculation.
We have already explored the Coriolis mass flowmeter and considered how it measures density. Two other methods are routinely used for measuring density. The first is based on an oscillating U-shaped tube. A magnet induces the oscillations and changes in density affect the oscillations. This is then used to calculate the density. The second is based on sound velocity. A sound pulse is created and measured. Changes in density affect the sound velocity. However, these changes are unique to each individual liquid. The densities of liquids with different alcohol concentrations are used to calibrate the instruments. The instruments use the calibration data to calculate the alcohol concentration of the solution based on the characteristic oscillation or sound velocity. The figure below shows two such instruments:
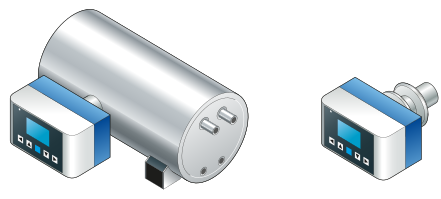
Figure: Oscillating tube and sound velocity density meters
The real difference between the two instruments is their accuracy. Sound velocity density meters are not as accurate as other density-based instruments.