
Lesson 6 - Design of Fermentation Vessels
This unit began with the principles that underpin fermentation. This lesson now explores how these are put into practice. It covers how fermentation vessels must be designed to suit the behaviour of the yeast strain being used, as well as the nature, scale, and sophistication of the processes available.
Fermentation Practice
This section discusses how fermentation vessels are used and managed, particularly in respect of cooling, oxygenation, and pitching.
We know from the Fermentation Principles lesson that getting everything correct at the beginning is vital.
It is also important to identify and manage the end-point; we explore this in the next section. As we will see, there are a lot of process options.
Fermentation control has three parts to it:
● Setting up the initial conditions
● Controlling fermentation rate by applying cooling
● Identifying the end-point and moving beer onto the next stage of processing
To set up the initial fermentation conditions, the brewhouse supplies hot sterile wort at a predetermined composition, volume, and strength.
The processes that need to be carried out now are:
● Wort cooling
● Wort oxygenation
● Yeast pitching
Wort cooling
Traditionally, worts were allowed to cool naturally using vessels called coolers, or coolships. These were shallow vessels – originally made from wood but later iron or copper, then stainless steel – typically about 15 cm in depth with a big surface area to help with heat transfer. Contamination was inevitable, particularly since the rooms were often fitted with open louvres to allow good airflow from ouside.
Later installations tried much harder to prevent contamination, using rooms with few internal fittings, cleanable surfaces, isolation from the rest of the brewery, filtered and refrigerated air, and methods for preventing condensation such as domed ceilings and steam-heated walls. Of course, in the case of beers made with spontaneous fermentation, no efforts are made to prevent contamination; instead, great care is taken to make sure that the environment around the wort cooler is not disturbed to try and get consistent inoculation.
During cooling, cold break forms and this drops out and is left behind when the wort is run off. Wort was recovered from the solids and usually added to the next batch of wort after pasteurisation.
In the majority of breweries, coolships were later replaced with wort coolers. Initially these were open and hot wort was passed over water-cooled copper plates or tubes.
Modern wort coolers are very efficient, closed stainless steel plate heat exchangers (PHEs).
Wort oxygenation
Dried yeast does not require wort oxygenation.
Most ale yeasts have quite low oxygen requirements and only require aeration (around 8 mg/L oxygen). Sufficient oxygen will usually dissolve in the wort if smaller fermenting vessels are filled from the top in a way that makes sure the liquid has time to be exposed to air.
For most lager fermentations, especially those carried out in large closed vessels using concentrated worts, we need to use pure oxygen (10-30 mg/L). Getting the right concentration every time is vital for consistent fermentation performance.
In sophisticated systems, sterile oxygen is added in-line during wort transfer using very accurate mass flow meters. Often it is added to the heat exchanger which gives very good mixing and a long pathlength to promote solution. The dissolved concentration may be measured further downstream using suitable meters and the value used to control the rate of addition.
It is best to make the addition on the cool side of the heat exchanger to minimise wort oxidation but the gas must be sterile.
Wort pitching
We discussed control of the pitching rate in the Yeast Management lesson (Yeast unit/Lesson 8).
Pitching can range from the simple manual addition of yeast to wort in a fermenter (usually during fill) and using a paddle to dipserse the cells, all the way through to sophisticated automatic pitching systems. Whichever method is used, consistent fermentation performance requires as accurate control as possible.
The processes used to fill a modern large-scale fermenter are shown in the next figure.
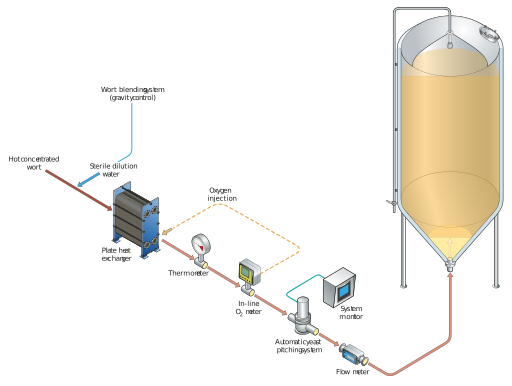
Figure: Processes used during wort transfer
In the case of large capacity fermentations, there can be a lot of other complications.
Large vessels take a long time to fill, often 12-24 hours, and use several batches of wort. No brewer wants to take risks with a big volume of wort and so vessels are usually pitched as soon as transfer begins. However, do we add it all with the first batch of wort or split it across the whole filling time?
It is the same with wort oxygenation. Mass flow meters let us add a controlled mass of oxygen. We can dose it all in at the beginning, spread it across the whole of the vessel filling time, or add some to certain batches but not others.
There are clearly a lot of options here. When taken with our earlier discussions about how the genome and metabolism of yeast reacts to changes and how long these things take, we can see that it is not enough to characterise the control of these fermentations simply in terms of pitching rate and how much oxygen is added.
Here are some points we need to bear in mind:
● Wort transfer can take up to 24 hours.
● Yeast begins to bud around four hours after pitching but a lot of changes need to occur before this outward sign of yeast growth is seen.
● Wort nutrients are taken up by yeast in an ordered process.
● Addition of fresh wort to already growing yeast is likely to disrupt this ordered process.
● Pitching the yeast at different times in wort transfer is not likely to give a population of cells at the end with consistent physiology.
● Different pitching and oxygenation regimes are likely to have an effect on beer flavour.