
Lesson 6 - Yeast Propagation
This lesson explores yeast propagation, the supply of pitching yeast and its fitness for purpose. We will explore yeast cultures and the protocols for its storage, along with how to propagate new cultures within the laboratory. This knowledge will enable us to demonstrate an understanding of the design features required for a yeast propagation plant.
Laboratory Propagation
This first part of the propagation process is recovering the master culture from storage and making a working culture for propagation. This has to be to a scale sufficient enough for transfer to the brewery.
Making a working culture
These steps use classical microbiological techniques. An excellent aseptic technique is essential. If anything goes wrong at this stage, the whole of the propagation process will be compromised.
As mentioned, the first step is to recover a sample of the master culture from storage and use this to make a working culture. This takes the form of a small-scale liquid culture using an artificial yeast sugar, nutrient medium. The culture is checked for purity and identity, with this last check preferably by genetic fingerprinting.
Once quality checks are passed, the liquid culture can be used as it is, or more typically, to inoculate a set of slopes if the culture needs to be distributed to other breweries. Slopes must be stored and transported in a controlled manner to ensure traceability and no loss of viability. A slope is only used once.
Laboratory propagation
The slope is used to inoculate a series of cultures of artificial liquid medium of increasing scale, as shown in the diagram.
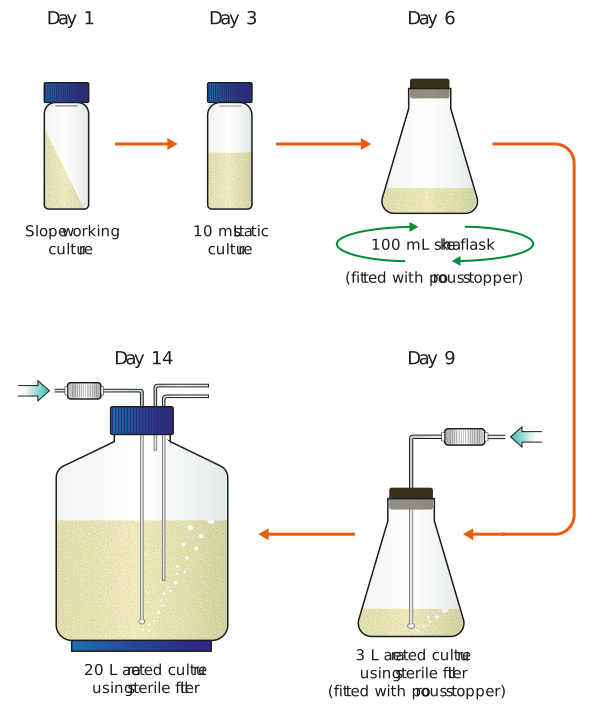
Figure: Stages in laboratory propagation
This is a typical laboratory yeast propagation schedule, although many variations in this are possible depending on the scale of operations.
The last stage in the laboratory needs specialised apparatus:
Key features are:
-
Apparatus is usually glass apart from the last stage (discussed in more detail blow)
-
An artificial yeast medium based on glucose or maltose is used for all stages apart from the last which uses sterilised wort
- The dilution of starting yeast concentration between each stage are 10 to 20 times
-
All stages are incubated at 20-25 °C
-
Every precaution must be taken to avoid contamination: good aseptic technique, all media and apparatus to be sterilised, use of microbiological gas filters on inlets and outlets, where appropriate
-
Good aeration is essential to ensure good yeast growth
Laboratory propagation takes one to three weeks, but since the apparatus is not costly multiple propagations can be run simultaneously if necessary. Some yeast strains grow faster than other so the process takes less time. If we use more yeast in the first step the process can also be faster.
-
Usually about 20 L working volume
-
Capable of being sterilised
-
Efficient aeration
-
Means of aseptic inoculation and sampling
-
Method of aseptic transfer into the brewery propagation vessel
-
Made from stainless steel for safety in the brewery
Suitable flasks can be bought or made to the brewery’s own design, but the key features are shown below.
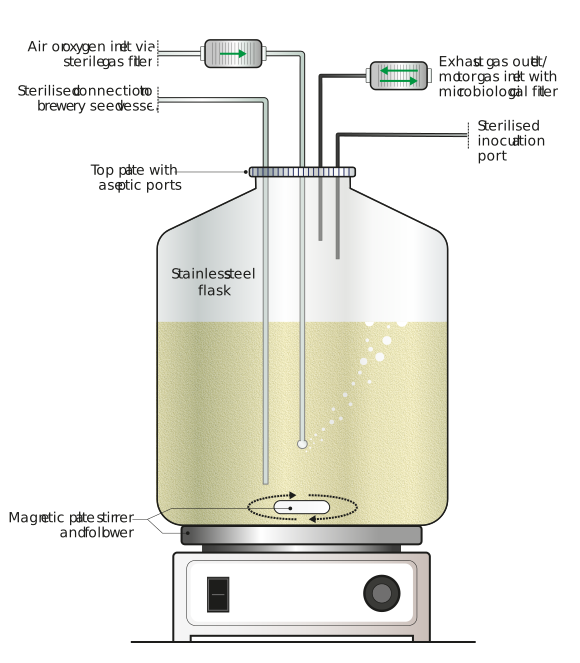
Figure: Propagation vessel for terminal laboratory stage
The flask is mounted on a trolley to make transport into the brewery easier. After an aseptic connection has been made to the brewery seed vessel, the culture can be transferred using a compressed gas supply attached to the exhaust gas outlet that is fitted with a microbiological sterilising filter.
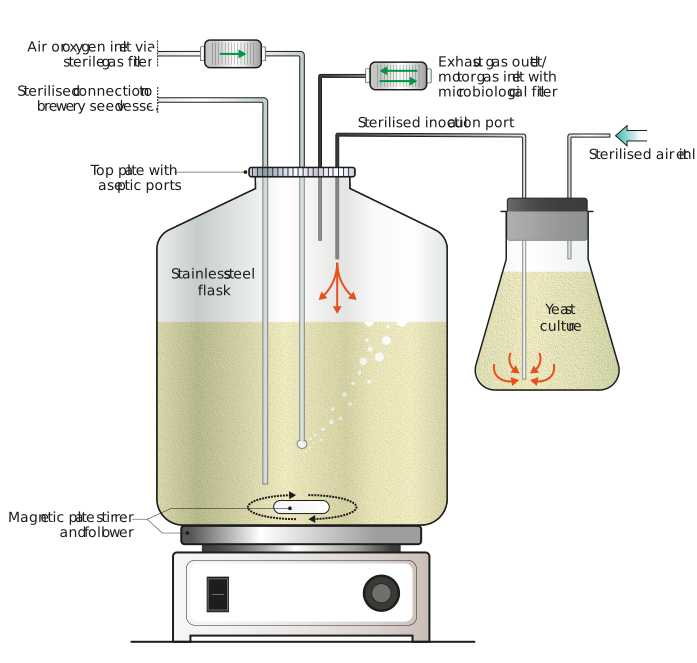
Figure: A flask used for the terminal laboratory phase of propagation. This shows the transfer from the prior growth phase.