
Lesson 4 - Wort Cooling and Oxygenation Technology
This lesson will firstly compare the design and operation of different wort cooling systems, and will give you enough information to help you describe why you would choose one wort cooling system over another. It will then move on to wort oxygenation systems, giving you enough information to help you make the same decision regarding this type of system.
Cooling Design Options
A typical large brewery cooling system design would resemble that shown in the diagram below. This design is known as a single stage heat exchanger. This is because there is only one wort cooling medium, known as a coolant.
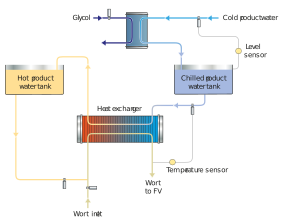
Figure: A single stage heat exchanger
We can see from this design that a separate heat exchanger is required for the cooling medium itself (water). Another clear benefit shown is that it generates a large amount of brewing hot water, and at a higher temperature.
The advantages of single stage heat exchangers:
- Simple construction.
- Simple operation and control.
- Low capital cost.
- High efficiency of recovered heat.
- Chilled water temperature can be flexed to optimise both energy and flows.
There is another wort cooling option that we can also include, which is the design and use of a double stage heat exchanger. The design below shows that there is a second coolant in addition to the chilled water. This coolant cools the wort. It is usually glycol, industrial methylated spirits (IMS), brine or even alcohol solution. This is interesting, as we still generate our much needed hot water for brewing, as recovered energy. However, we can also see that the glycol is present to directly cool the wort to a lower degree than could be achieved by the water alone.
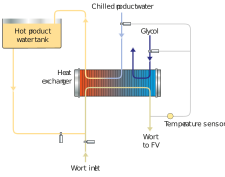
Figure: A double stage heat exchanger
Due to the use of a secondary coolant, a double staged heat exchanger achieves a colder discharge temperature of the wort.
Let us quickly recap our objectives. We have covered cooling, hygiene and cycle time requirements. We have also discussed the recapture of the thermal energy in our hot wort. Before we start to add oxygen and yeast to begin fermenting our wort, let us first look at the control of volume and gravity.
There are two main points that we will cover here:
- The possible addition of dilution water.
- The contraction loss, as wort is cooled.
These points seem misplaced and somewhat ‘exotic’ in nature but are important both in practical and theoretical terms. They heavily determine our fermentation cellar design. For example, if we were to dilute our wort before we collect to the fermenter, then the fermenting vessels would need to be bigger.
The addition of dilution water at this stage of brewing presents the brewer with some options to specifically control the gravity of fermentation. This dilution water can be added continuously in-line to the wort flow on the hot or cold side of the heat exchanger. Or alternatively, it can be added batch wise to the fermenter, either before or after cold wort addition.
If the water is added in-line after the wort cooler, the water must already be at the correct temperature of fermentation. It must also be sterile, as we must work hygienically on the cold side of the heat exchanger. We would also have to rely on the pipework, pumps and vessel entry to achieve mixing. Otherwise, there is a greater chance of layering in the fermentation tank.
If the water is added in-line before the wort cooler, then the cooler must be larger, as there is a greater volume to cool. We would generally not want this to take longer! However, this is easier to control by using a direct feedback loop. This would dose the correct amount of dilution water, based on the brewhouse volume and gravity. There are no hygiene or mixing concerns with a direct feedback loop, as the water can be hot and is being mixed with hot wort via the heat exchanger. This affords good mixing, especially when dosed along the entire cooling duration. We can also recapture all the energy from the dilution water as we do with the hot wort e.g. in the form of hot brewing water.
If the dilution water is added batchwise to the fermenter, then the amount can be based on the gravity ex-brewhouse (kettle or whirlpool). It can also be based on the gravity in the fermenter itself, which is inherently more difficult to ascertain. The hot brewing water does need to be cooled down before being added to the fermenter. This is usually done through the wort cooler itself. This is a simpler and cheaper option which can also assist in flushing the mains, if used after wort addition. However, it may also present layering issues due to poor mixing.
Let us explore contraction loss a little more. The difference in volume is classically 4% between hot and cold wort. In other words, our wort decreases in volume by 4% as we cool, typically from 100°C to 20°C. We know that as a sugar solution, wort has a specific gravity, which we as brewers convert to °Plato. We also know that the specific gravity (density of a solution) must be measured at a fixed temperature (usually at 20°C), as density is temperature dependent.
Therefore: 


These cooling processes provide some options to the brewer. As already discussed, this will depend on our materials, processing equipment and the brands we are brewing, using the relevant brewing yeast.
This leads us to oxygenation.